Disinfect Germs Such as Food Poisoning in Water Automatically
Germs in gas or liquids can be killed easily by pumping them through tanks in a Chlorine room. This takes advantage of the game mechanic where germs within tanks (but not pipes) are killed when immersed in chlorine. While this is especially useful for killing Food Poisoning held in Polluted Water or Water, the same mechanic can also be used to remove any kind of germ from any kind of liquid or gas (e.g. Slimelung from Polluted Oxygen or Oxygen). How much chlorine is used does not matter: As long as no other gases are present in the room, a little bit of chlorine will work just as well as a lot of it.
Chlorine rooms are useful for killing the food poisoning germs present in duplicant wastewater (from e.g. lavatories), so that the polluted water can be safely sieved and reused. The resource and power cost of doing so is very low, although some Advanced Research will be necessary.
This guide will cover some general techniques as well as two example setups for creating chlorine rooms to remove food poisoning from liquids: A compact method designed for purifying periodic small batches of liquid, and a larger method which can handle any quantity and frequency of inputs (high- or low-throughput, frequent or irregular). The same techniques can be applied to remove any kind of germ from any kind of liquid (or gas - just replace the liquid pipes, tanks, sensors and shutoffs with gas versions of the same).
General Tips
A chlorine room will usually require the following components:
- One or more Liquid Reservoirs ("tanks"), for holding liquids while they are disinfected
- Chlorine atmosphere, such that the tanks are constantly submerged in it (if other gases are present, they should be at least semi-contained so that they do not displace the chlorine around the tanks)
- Input and output Liquid Pipes
- A way of interrupting the output flow, to prevent infected fluids from leaving the room
- Optionally: Duplicant access to the room
Numbers 1 and 3 are usually a relatively straightforward matter, although the number of tanks and pipes will vary depending on the flow rate/amount of liquid to be processed, the number of germs the liquid contains, as well as the chosen strategy for Number 4: How to determine when it is safe to let liquid leave the room. There are several viable strategies for this, such as the following:
- Enable/disable a Liquid Shutoff using a Liquid Pipe Germ Sensor to detect the presence of germs in the output pipe
- Enable/disable a liquid shutoff using timing circuitry, letting liquid leave the room once a fixed amount of time has elapsed
- Use a liquid shutoff or Liquid Bridge to allow liquid to leave only when all buffer tanks are full, relying instead on constant circulation through the tanks to kill all germs
The latter two strategies above will be showcased in the example setups below.
Number 2 can be accomplished via a number of methods, including any of the following (roughly in order of decreasing resource/technology cost):
- Using one or more Gas Pumps, pump all gas out of the room, then deconstruct/disable the pump(s) and pump chlorine from elsewhere into the room via more gas pumps
- Using one or more Gas Pumps, pump all gas out of the room, then deconstruct/disable the pump(s) and dump some Bleach Stone into the room (e.g. by constructing a Storage Bin with the appropriate storage filters)
- Find a natural chlorine pocket and try to enclose it with solid tiles such that it becomes a room suitable for disinfecting liquids
If available, bleach stone is highly useful for this purpose: it is easily-transportable (via Duplicant) and in small quantities, plus it avoids having to build a likely-temporary network of wiring, piping and pumps for transporting chlorine gas across the asteroid. Optionally, some gas filtration may be present to remove unwanted gases from the room once they enter it (e.g. a Carbon Skimmer for removing carbos dioxide exhaled by duplicants in the room). That said, it is usually easier to avoid allowing duplicants to access the room once it is complete, thereby avoiding allowing foreign gases inside; any carbon dioxide exhaled by duplicants during construction can be dealt with by a carbon skimmer, or even by leaving a pocket in the floor (or a lower level with separating Mesh Tiles or Airflow Tiles) for the CO2 to settle down into.
Note that how much chlorine is used does not affect the speed of the disinfecting process: As long as the tank(s) are submerged in chlorine and only chlorine, any amount will do.
Number 5 is optional once the room is finished, since duplicants should only need to access the room in order to renovate it, and repeated access to the room (especially without Atmo Suits) can introduce foreign gases. However, some method of gas-exchange-avoiding access may be necessary to construct the room's contents (especially if building the room in situ in a natural chlorine pocket, in which case the building comes after the atmosphere has been established). The preferred access method may depend on available resources and (especially) which specific gases exist in the atmosphere nearby the room:
- Airlocks are feasible for temporary access if only certain kinds of gas are expected to be nearby:
- If only gases less dense than Chlorine are nearby (such as Oxygen, Polluted Oxygen, Steam or Natural Gas), an airlock placed in the ceiling is an option.
- If only gases more dense than Chlorine are nearby (such as Carbon Dioxide), an airlock placed in the floor is an option.
- Otherwise, if the nearby atmosphere is lower-pressure/Vacuum, or a turbulent mix of gases, or especially if a long-term access point is desired, then a liquid airlock is advisable. This can even be combined with a proper airlock.
Setup 1: Small Regular Batches
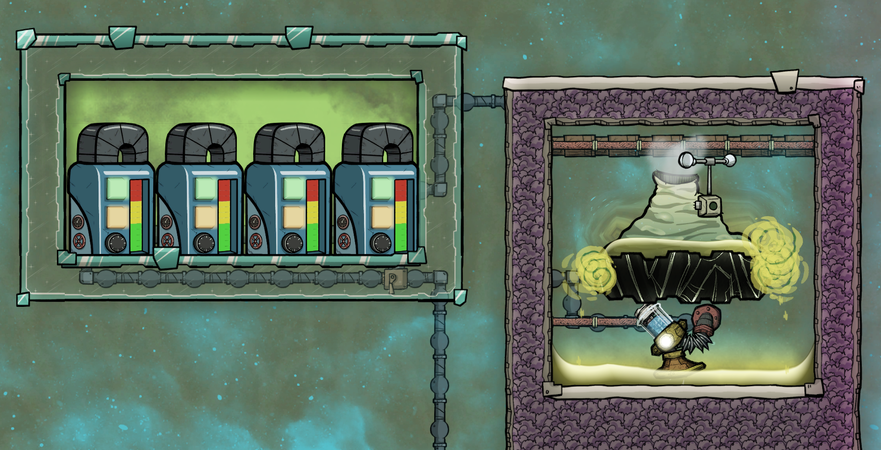
The following setup can be used for disinfecting germs from water in smaller batches in regular intervals. It is especially useful in the early-game for handling wastewater from washrooms, although it does require some automation, and thus small amounts of power and refined metals.

An example of a batched chlorine room. Water is pumped into the room from the left, and leaves the room to the right.

The germ-laden water enters the chlorine room, sits in quarantine for a set amount of time, then is pumped out after. Because germs inside pipes are not disinfected, a Liquid Shutoff cannot be used on the tank output line, because the packets of water stuck between the tank and the shutoff would still contain germs. Instead, a Mechanized Airlock is used as the floor for the Liquid Reservoir: When the door is open, the reservoir will not output (but can still receive input).
Note that the airlock does not need to be powered: It will still function unpowered, although as it will open and close more slowly, you may need to adjust your timing circuitry to compensate - or simply extend the amount of piping between the input shutoff and the reservoir input, such that the door has fully closed by the time liquid arrived at the tank.
The build pictured here is only one example of how to build this style of chlorine room. Instead of using an airlock as an output shutoff, you could use any of the following (among other things) to prevent germy water from sitting in the output pipes:
- Use a liquid shutoff on the output line but "prime" each cycle, by allowing a small amount of clean (germ-free) water into the tank before letting it accept dirty (germ-filled) water, such that the clean water winds up filling the output line by the time any dirty water begins entering the reservoir.
- Use a liquid shutoff on the output line but just before enabling the main output shutoff, flush the output line by diverting it away from the clean water supply. Note that liquid shutoffs have somewhat similar behavior to Liquid Bridges, in that liquids will always prefer flowing through the shutoff to flowing through a regular pipe.
- Continuously loop the liquid from the output of the tank back into its input, while the output shutoff is off. This can take advantage of the priority mechanism of liquid bridges: In the second setup in this guide, below, this mechanic is discussed in detail, and used in that setup to continually disinfect large amounts of germy liquid.
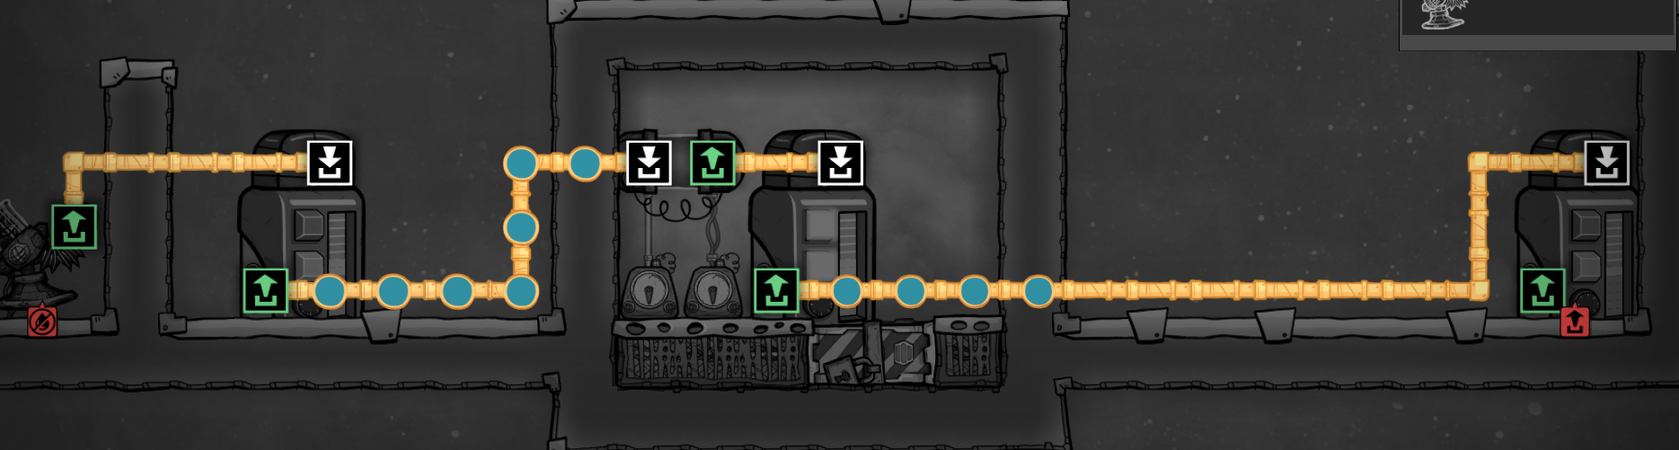
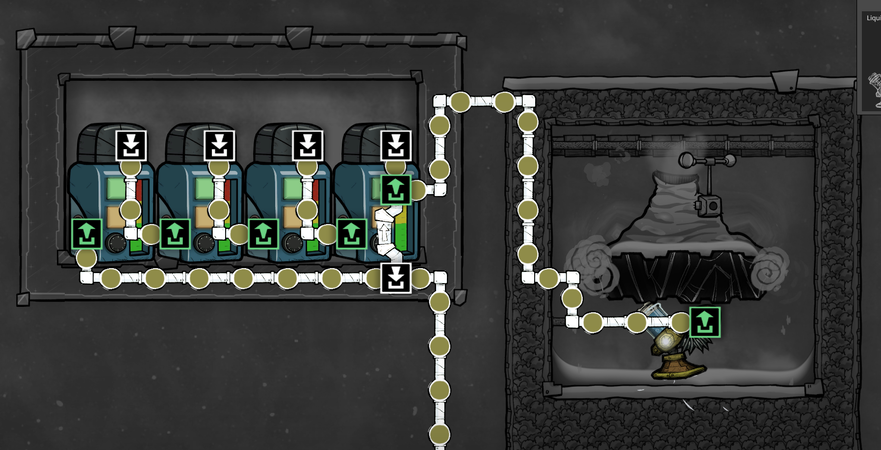
Plumbing Overlay of the same batched chlorine room.

The Cycle Sensors are used to specify specific times within each cycle to enable/disable each shutoff. Some trial-and-error may be needed to find good timings to use for each chlorine room's use cases. Timer Sensors can be used instead, and/or any other appropriate Automation circuitry. The operation cycles between four phases: Input shutoff enabled; input shutoff disabled (while germs are disinfected); output shutoff enabled; and output shutoff disabled (ready to accept input again). Timings should be adjusted so that all germs have died out fully before the output is enabled. Additionally, each shutoff should be enabled for the same duration.
The example pictured here has the following approximate timings: Phase one (input on) is the first 33% of each cycle; phase two (disinfect) is the next 33% of the cycle; phase three (output on) is the third 33% of the cycle; and phase four (reset) is the final 1% of the cycle. (Phase four is probably unnecessary for most setups, but was left at 1% as a precaution.) The cycle sensor settings to achieve this timing were: Input sensor on at 0% for 33%; output sensor on at 99% for 67%. (This example uses an airlock for the output shutoff, so the automation signal supplied to it needs to be the inverse of what would need to be used for an actual liquid shutoff, as a green signal causes the airlock to open and disable the output. If an actual liquid shutoff were used instead of an airlock, the settings for the output cycle sensor would be on at 66% for 33%; those timings could also be used with this example design by inserting a NOT Gate between the cycle sensor and the airlock.)

Automation Overlay of the same batched chlorine room.
Note that liquid reservoirs have had automation ports added to them since this image was captured; if attempting to build this design, make sure not to run its automation wires through the reservior's automation port (which would be on its lower left tile).

Here is an actual build of this style used inside a real base. For reference, the clean water reservoirs are the ones on the lower right. This build uses multiple liquid shutoffs in place of the airlock.

Setup 2: Extendable, Any Amount, Feedback Loop
This example takes advantage of the daisy-chaining of multiple pre-purified liquid reservoirs to ensure that liquid is always germ-free by the time it leaves the final tank. Although this setup is a very simple construction, requiring no refined metals, power, or even automation, it can be difficult to establish it. Its operation is simple:
- Input liquids come into the room and enter the first tank, mixing with its contents (thereby diluting and purifying it).
- The same amount of liquid then leaves the first tank and enters the next, now with significantly reduced germ content. In turn, it mixes with the second tank's contents, diluting and purifying even further.
- This process repeats until liquid leaves the final tank, at which point it is completely germ-free.
This system only works if two preconditions are met: That all of its tanks are kept as full as possible at all times, and that the tanks' contents are all 100% germ-free before any additional liquid enters the room. Additionally, the specific number of tanks required for this process to work depends on a number of factors: the temperature of the liquids, plus the specific germ type and how many germs they contain. For washroom wastewater, two tanks may be sufficient; for Polluted Water Vent output, up to four may be needed.
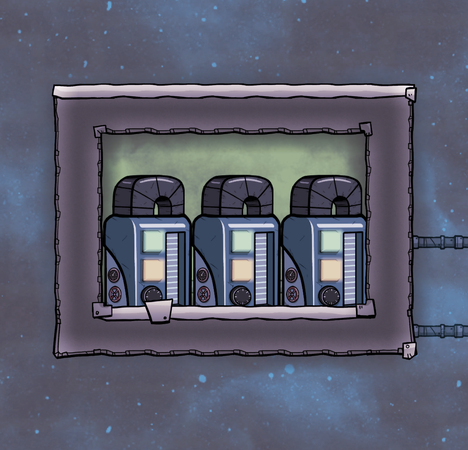
A feedback loop chlorine room with 3 liquid reservoirs.
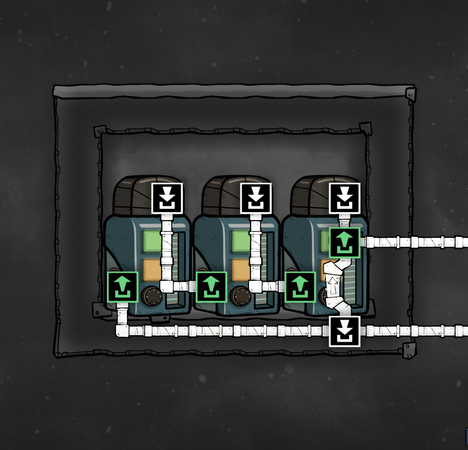
Plumbing Overlay of the feedback loop.


In order to ensure that the tanks are kept full, and to aid in the purification of their contents by constantly exchanging them, the system is kept in a constant feedback loop by joining the output pipe line back onto the input with a Liquid Bridge. This takes advantage of the priority mechanics of pipe bridges: the contents of the output line will always prefer taking the bridge, thus the system's output will always be trying to loop back into its input. However, the pipe bridge will always be preempted by any contents already in the input line. This means that the output line's contents will always loop back into the tanks if the input line is empty, and can only leave the room when the input line has contents - which is to say that the same amount of fluid will still leave the room as what enters it.[1]
Example A: Washroom Filtration
This example uses a feedback loop design to disinfect the waste Polluted Water from a washroom. The main source of polluted water in a washroom is the Lavatory, each of which outputs 11.7 kg of polluted water containing 100,000 food poisoning germs per use (for a specific germ content of about 8,547 germs/kg). Depending on your duplicants' washroom usage patterns, as well as other factors such as temperature, two liquid reservoirs might be enough to handle one washroom, but it will struggle with any significant flow. Therefore this example uses three tanks, which is enough to guarantee germ-free output - it can even handle a constant 10 kg/s of lavatory wastewater.
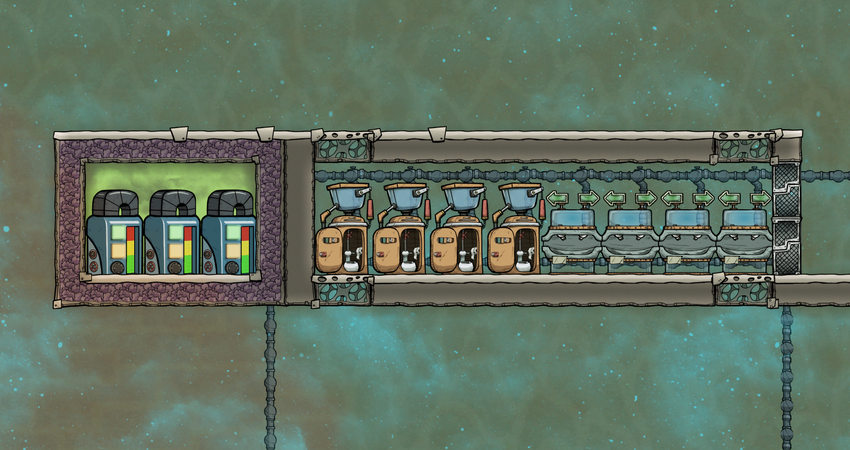
A washroom with a feedback loop chlorine room.
Plumbing Overlay of the feedback loop.
For a higher-resolution version of this image, see here.


Example B: Polluted Water Vent Purifier
This example uses a feedback loop design to disinfect the polluted water from a Polluted Water Vent. This particular geyser outputs about 10.5 kg/s of polluted water while active, which is enough to fully saturate the pipeline (10 kg/s max) while it is active; the chlorine room with its four tanks is fully capable of purifying the polluted water at up to 10 kg/s, indefinitely. The fourth tank is needed for this design due to the higher specific germ content (20,000 germs/kg) compared to a lavatory (≈8,547 germs/kg).
A polluted water vent, with output being pumped through a feedback loop chlorine room.
Plumbing Overlay of the feedback loop.


Activation Instructions
A feedback loop chlorine room must be properly activated before it can be used, to ensure that its tanks are full and that germs are completely absent from both its tanks and pipes. This can be accomplished in just a few simple steps:

- Starting by building the chlorine room with its tanks and piping, and filling it with chlorine. Do not allow any liquid to enter the tanks until the room is fully constructed. Once the room is ready to begin operating, proceed to the next step.
- Next, fill all of the tanks with liquid. This can be easily accomplished by disconnecting the output pipeline after the liquid bridge (i.e. not between the liquid bridge and the last tank) either by deconstructing or with the Disconnect tool, then allowing liquid to enter via the input pipeline.
- Once the tanks are completely full, disconnect the input pipeline before the liquid bridge (i.e. not between the liquid bridge and the first tank). The tanks now need to circulate all of their contents with each other: this will allow the tanks to disinfect their contents, while also cycling liquid through the pipes of the feedback loop. If the pipes have backed up and are not circulating any liquid at all, then some of their contents need to be removed:
- This is most easily and cleanly accomplished by having a duplicant with the Plumbing skill empty a pipe segment a few times, until the liquid begins to circulate. Having a plumber empty the pipe saves a lot of mess and annoyance. (Remember to cancel the Empty Pipe task after the flow resumes.)
- Alternatively, deconstruct one or more of the pipes between the tanks. This is much messier, because it will release liquid into the room; it can also have additional consequences - e.g. if the liquid is Polluted Water, then if the chlorine pressure is low enough, the spilled polluted water will offgas into Polluted Oxygen, displacing some of the chlorine.
- Keep an eye on the germ content of the tanks and feedback pipes: Once all of the germs have been removed, the room is ready for operation. Just re-connect the input and output pipes. (If they were merely disconnected, this can easily be done with the build tool, requiring no further construction.)
References
- ↑ Kharnath's Compendium of Amazing Designs on Steam. (Archived copy here, from the original on 2022-10-29.)